Using Pine on Solix
Starting Pine
-
How to login into your account from the labs. There are several methods to
connect to solix
-
If there is an icon labeled Connecting to Hosts on the desktop
-
Double-click the icon
-
Select solix from the list
-
If solix isn't there,
-
Choose any name.
-
When you are asked for a user name on the other computer, then go to the
Connect menu and select Disconnect.
-
Then go to the Connect menu again and select Remote System.
-
From there, enter solix.fiu.edu as the name of the host.
-
If there isn't a Connecting to Hosts icon
-
Click the Start button at the bottom of the screen.
-
Select Programs from the pop-up menu.
-
Select Connecting to Hosts, or Connecting to Solix, or Telnet from the new
pop-up menu. Follow the instructions listed above for Connecting to Hosts.
-
Once you have connected to solix
-
Enter your user name
-
Enter your password
-
Opening the e-mail program
-
At the prompt with the % in it, type the word pine
Main Menu in Pine
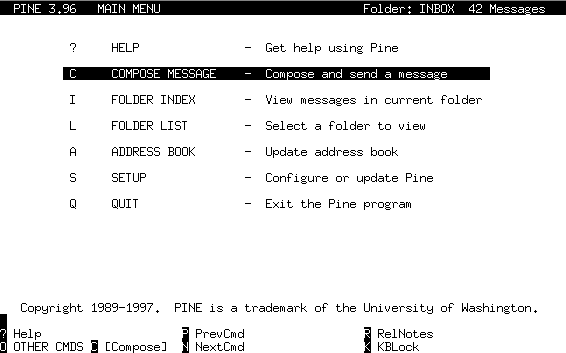
The letters for
the main menu options can be pressed most of the time during a session to
take you to that page. There are a few situations when the letters won't
take you to the page, like when you are composing a message.
Composing a new message
Press letter C. You will see the following screen:
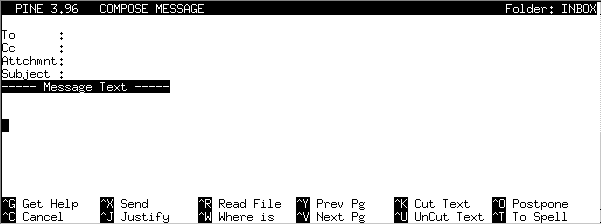
-
To:
-
Fill in the full internet address for the person you are trying to reach.
For instance, my full e-mail address is downeyt@fiu.edu
-
Cc:
-
Carbon Copy (or Courtesy Copy) will send a copy of the message to this person
as well. One use for this is to send a CC to yourself every time you submit
a homework via e-mail. This way you have a copy of everything you send to
me.
-
Attchmnt:
-
It is possible to send an accompanying file along with the current message.
This saves you the effort of retyping a message that you want to quote. However,
you can also send pictures and programs as attachments. The file you want
to attach must be located in your home directory on solix. Just type
in the name of the file to attach.
-
Subject:
-
This should be a short description of the message, a few words will suffice.
When submitting homework, be sure to include your name and section.
-
^X
-
Ctrl-X sends the message. Even after pressing Ctrl-X you will be asked to
confirm that you want to send the message.
-
^C
-
Ctrl-X will cancel the current message. Even after pressing Ctrl-C you will
be asked to confirm that you want to cancel the message.
-
^T
-
Ctrl-T invokes a spell checker. It will identify misspelled words, but will
not offer correct spellings.
[Return to Main Menu]
Viewing a list of messages in your folder
Press letter I. You will see a screen similar to this. Your screen
might not have any messages in it ... yet.
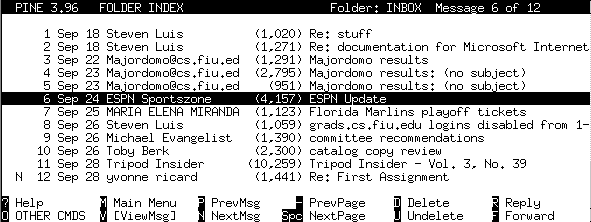
The letters in front a message have special meanings
-
N
-
This is a new message that hasn't been read yet.
-
D
-
This is a message that has been marked for deletion.
-
+
-
This means that the message was sent directly to you, not as part of a mailing
list.
The following operations can be performed from this screen:
-
Enter
-
By pressing the enter key, you will see the contents of the message that
is highlighted. After you press Enter, you will see the text of the message.
However, all of the options listed here also work when viewing the text of
a message.
-
D
-
Pressing the letter D will flag the highlighted message for deletion. The
message will not be deleted until you expunge all deleted messages. This
will happen by pressing the letter X, or when you exit pine. A D before
the message means that it is flagged for deletion.
-
U
-
Pressing the letter U will unmark the file if it was marked for deletion.
-
X
-
Pressing the letter X will delete all files that have been marked for deletion.
-
R
-
Pressing the letter R will open the Compose Message screen, with the
To: field filled in witht the highlighted messages sender.
-
F
-
Pressing the letter F will open the Compose Message screen, with the contents
of the highlighted message placed in the message area of the new message.
-
S
-
Pressing letter S will allow you to save the current message to a different
folder. The current folder is Inbox, and it is a good idea not to
clutter it up too much. So, when you receive a message that you want to keep,
move it to a different folder. If the folder that you type in doesn't exist,
then pine will create it for you. Some folders you might want to create:
HW, JOKES, FRIENDS.
[Return to Main Menu]
Viewing a message that has an attachment
When you receive a message that has an attachment, it will look different
on the message view screen.
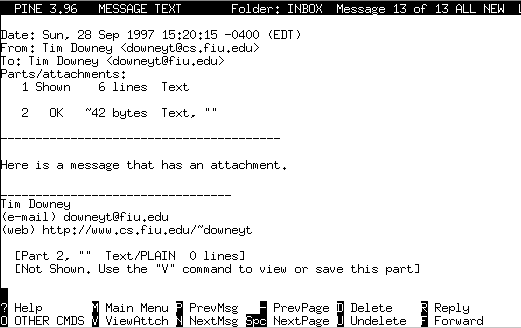
The first section of this message indicates that there are two parts to this
message. Part 1 is the message that was sent; Part 2 is the attached file
that was sent.
The entire Part 1 is shown on this screen, but Part 2 is not shown. To see
Part 2, it is necessary to press "V" in order to go to the View Attachment
screen. From that screen you can view either Part 1 by itself, ot Part 2
by itself.
[Return to Main Menu]
Switching to a different folder
Press the letter L. Your list will look different from this.
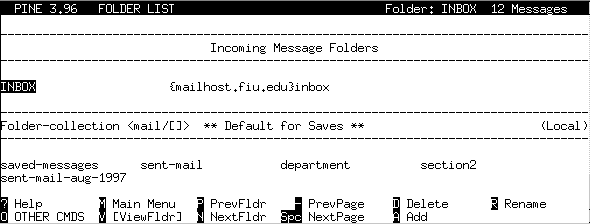
To switch to a different folder, move the highlight to the one you want and
press Enter
-
D
-
Delete the highlighted folder.
-
A
-
Add a new folder.
[Return to Main Menu]
Creating an address book
Press the letter A. Your address book will look different than this.

-
D
-
Delete the current address from the address book
-
A
-
Add a new address to the address book. When you add a new address, you will
see the following screen:

-
Nickname
-
This is the name that you will use to refer to this person. Notice I have
include "me" in the above address book. This makes it easy to send a CC to
myself.
-
Fullname
-
When you compose a message and type a nickname, the person's Full Name will
be substituted for the nickname.
-
Fcc
-
You can automatically save a copy of the message to a file.
-
Comment
-
This comment will only appear in your address book, not in the message to
the person.
-
Addresses
-
Put the person's full e-mail address here. You can create a mailing list
by placing several e-mail addresses here, each one separated by a comma.
[Return to Main Menu]
Creating a signature file
From the Main Menu, select S. From the Setup Menu select S
again. You will see the following screen:

Anything you type here and save will be appended to every mesage you send
from pine. Try to keep your signatue file short: at most four lines.
You might include a qoute that you like, or you e-mail address...whatever!
-
^X
-
Ctrl-X will save the changes to your signature file.
-
^C
-
Ctrl-C will cancel the changes that you are making.
[Return to Main Menu]
Here is a list of all the commands available in pine for each of the different
screens
Folder List
M: Main Menu, V: View Folder (also Enter), P: Previous Folder (also Up Arrow),
N: Next Folder (also Down Arrow), - (minus sign): Previous Page, Space: Next
Page, D: Delete Folder, A: Add Folder, R: Rename Folder, ?: Help, Q: Quit
Pine, O: Other Commands, C: Compose Message, G: Go to Folder, I: Index of
Current Folder, W: Where is a folder, Y: Print this page.
Folder Index
M: Main Menu, V: View Message (also Enter), P: Previous Message (also Up
Arrow), N: Next Message (also Down Arrow), - (minus sign): Previous Page,
Space: Next Page, D: Delete Message, U: Undelete Message, R: Reply to message,
F: Forward message, ?: Help, Q: Quit Pine, O: Other Commands, C: Compose
Message, L: List Folders, G: Go to Folder, Tab: Next New Message, W: Where
is a message, Y: Print this message, T: Take Address to Address book, S:
Save message to a folder, E: Export message to a directory, X: Expunge (delete)
flagged messages, J: Jump to a message (number), $: Sort messages.
Compose Message
Ctrl-G: Help, Ctrl-C: Cancel, Ctrl-X: Send message, Ctrl-D: Delete character,
Ctrl-R: Rich Header (Bcc, Fcc), Ctrl-J: File Attachment, Ctrl-Y: Previous
page, Ctrl-V: Next page, Ctrl-K: Cut line, Ctrl-U: Undelete line, Ctrl-P:
Postpone message, Ctrl-T: Take address to address book.
Address Book
M: Main Menu, V: View Entry (also Enter), P: Previous Entry (also Up Arrow),
N: Next Entry (also Down Arrow), - (minus sign): Previous Page, Space: Next
Page, D: Delete Entry, A: Add Entry, R: Reply to message, C: Compose Message
To Entry, W: Where is a entry, ?: Help, Q: Quit Pine, O: Other Commands,
L: List Folders, G: Go to Folder, I: Index of Folder, Y: Print this page,
T: Take Address to Address book, X: Export entry to a directory, F: Forward
entry via e-mail
To create a distrubution list, just add more than one e-mail address in the
TO field. Separate each address with a comma.
Setup
Signature, New Password, Printer (also Enter), Update, Config: Signature
at bottom


