CGS4825 Assignment 6
Due Thursday, 4/16 at 1 pm.
If you had any errors in Homework 5, then fix them, so that you don't lose
points twice for the same mistake.
Apache
Start your Apache server.
-
Create a subdirectory of
docRoot named styles.
-
Create a file named
cgs4854.css in the styles
directory.
-
Limit access to this directory to you and to me.
-
Change the default style for the page.
-
Change the color of the text.
-
Change the color of the background.
-
Change the font-family. Use at least three possible fonts; the last font
in the list should be a generic font family.
-
Change the default style for the
h1, h2 and h3
tags
-
Center the text.
-
Change the font-family that is used for
h1, h2
and h3 tags.
-
Use the same font-family for all three.
-
Use at least three possible fonts; the last font in the list should be a
generic font family.
-
Make the text in all
h1 tags display in all upper case letters.
-
Swap the background color and foreground color for
h1 tags.
-
Make the text in all
h2 tags display with capitalized first
letters in all words, with lower case letters for the rest of each word.
-
Make the text in all
h3 tags underlined.
-
Change the default style for the
img tag.
-
Refer to the w3c
site for information about the
border style.
You will also need to look at information for the border-style, border-color
and border-width, on the same page.
-
Add a double solid border for all images.
-
Change the color of the border.
-
Make the border five pixels wide.
-
Change the default style for the
kbd, var and
ins tags.
-
Make the same style definition block apply to all three tags.
-
Use a relative size to make the size of the text larger.
-
Use a different text color.
-
Change the default style for the
input and select
tags.
-
Use a monospace font.
-
Choose at least one specific font that is monospace.
-
The last option in the list of fonts should be for a generic monospace font.
-
Change the text color.
-
Change the background color.
-
Create a style named
error that can only be used with
strong tags.
-
Use a relative size to make the size of the text larger.
-
Use a different text color.
-
Change the default ordering that is used for
ol tags.
-
Do not change the style for any
li tags.
-
Do not create a named style.
-
Choose one of upper-roman, lower-roman, upper-alpha, lower-alpha.
-
Change the bullet that is used in unordered lists.
-
Create a style named
indent that can only be used with paragraphs.
-
Set the right margin. Use a relative measurement.
-
Set the left margin. Use a relative measurement.
-
Change the default style for hypertext links.
-
Change the text color.
-
Change the background-color.
-
Make the font 10% larger than the default font.
-
Change the default style for visited hypertext links.
-
Change the text color.
-
Change the background-color.
-
Turn off the underline.
-
Make the font 10% smaller than the default font.
-
Use the style sheet in all pages that can be accessed from Apache, including
all the files for your username web application on Tomcat (except the manager).
-
Modify the
index.html file.
-
If you have not already done so, add some descriptive paragraphs about your
web site.
-
Add some headings.
-
Create one
h1 heading at the top of the page.
-
Use several
h2 headings in the page.
-
Use at least one h3 heading.
-
Do not use a heading for an entire paragraph.
-
A heading should contain just a few words.
-
Use several
kbd, var and ins tags
throughout the page. Can you explain why they look different, even though
they all use the same style definition in the style sheet?
-
Use the
indent style on one of the paragraphs.
-
Upload an image to your site and include it in this page.
-
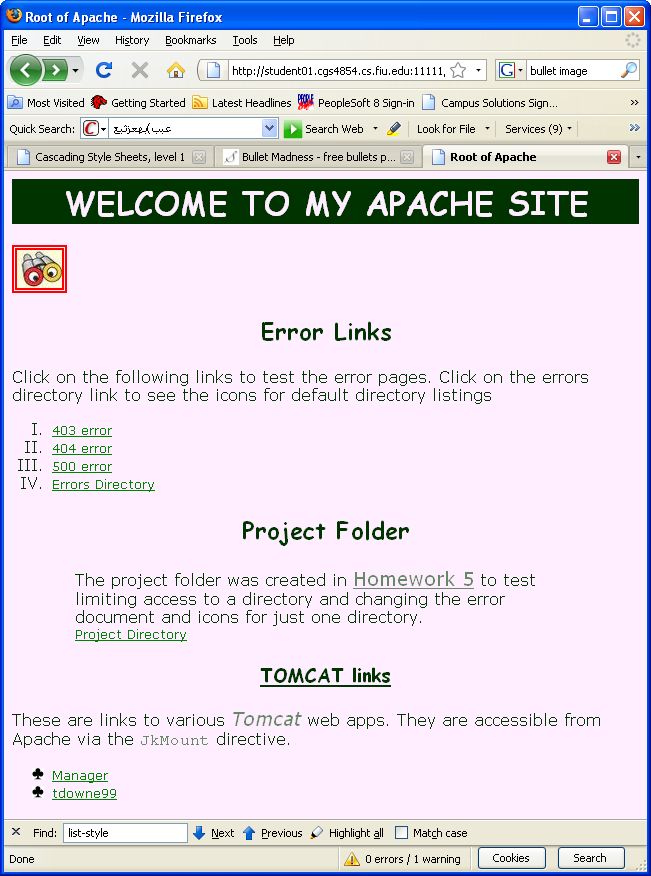
Use an ordered list to display the list of links that generate errors (from
a previous assignment).
-
Use an unordered list to display the links to Tomcat.
-
Modify the error pages from a previous homework.
-
If you did not get the error pages working, then get them working now.
-
Add one
h1 heading to each error page.
-
Be sure the error pages use the style sheet.
Persistent Controller
Create a new package for this assignment in your username web app.
-
Do not change the files that were used for assignment 5.
-
Assignment 5 should still be accessible from the web app.
-
You may copy files from assignment 5 into this new package.
-
You may import files from assignment 5, if they are unchanged.
-
Modify your application so that it can store data to the database.
-
Add all the necessary files to the
shared package.
-
Note that
HellperBaseCh5 should be placed in the
shared package.
-
Add all the necessary JAR files to the Libraries folder.
-
Controller
-
Modify your controller so that it can handle GET and POST requests.
-
Bean
-
Place the bean in the same package as the controller.
-
Maintain all the properties that are already in the bean for your project.
-
From HW5, modify the property that matched one of several words.
-
Use the mutator to store the string in lower case letters. For instance,
if one of the options is skiing and the user enters Skiing,
then store it as skiing.
-
Be sure your program does not crash if the property is null or the string
is of length zero.
-
The bean should implement required validation.
-
Continue to implement all the validations from HW5.
-
Modify all the messages in your annotations.
-
If some of your annotations use the default message, then define your own
message in those, too.
-
Include the name of the property in the error message.
-
Controller Helper
-
Use a unique name, other than "helper", to save the controller helper in
the session.
-
Modify
jspLocation so that it returns the correct path for JSPs.
-
Write the current data to the database when the process button is clicked.
-
Show all the records from the database in the view page.
-
Treat GET requests as the start of a new transaction.
-
Always show the edit page when a GET request is made.
-
Do not read the old data from the session when a GET request is made.
-
Treat POST requests as the continuation of a transaction.
-
Show the appropriate page based on the button that was clicked.
-
Read the old data from the session and copy it into the bean.
-
JSPs
-
There should be no hidden fields in any of the JSPs.
-
Use the Apache style sheet for all your JSPs.
-
Set the
href in the link tag to
"/styles/cgs4825.css"
-
This is the same
href that is used in all your Apache pages.
-
If your style is in a different directory or has a different name, then modify
the
href accordingly.
-
The style will only work when you access your site from ocelot.
-
The style will only work when the web app is referenced via Apache.
-
The
/ in the href always means the root of the
current server.
-
For Apache the root is
docRoot, so / equates to
docRoot.
-
Your style sheet should be in
docRoot/styles/cgs4825.css
-
From Apache,
"/styles/cgs4825.css" equates to the physical path
docRoot/styles/cgs4825.css
-
The JSPs should be in a hidden directory, but not in the same directory as
the controller. Move the JSPs to an appropriate subdirectory of WEB-INF (not
under classes).
-
Modify all the EL statements so that they refer to the new name that you
used to store the helper in the session.
-
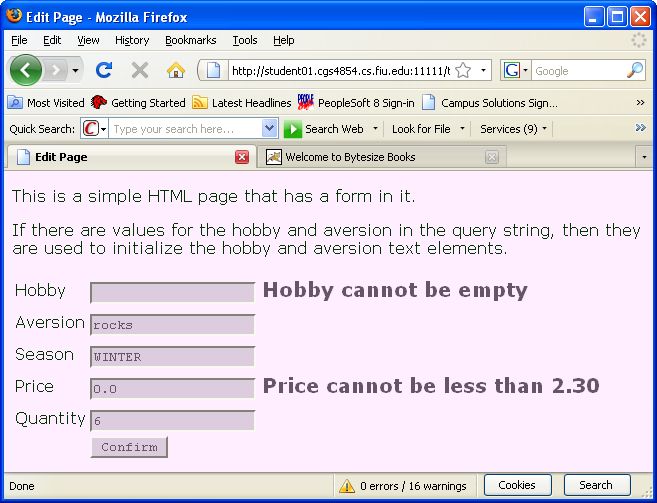
Edit page
-
Use a table to organize the input elements so that they appear in a column.
-
Display error messages for all properties that are not valid. Use the strong
tag for errors to give the error messages a different appearance.
-
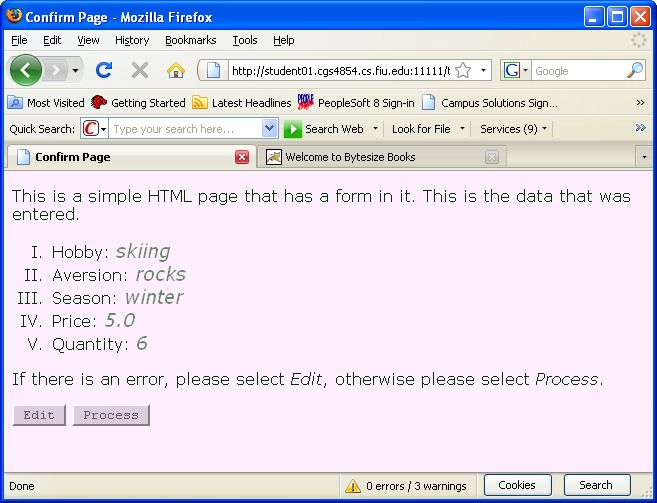
Confirm page
-
Use the
var tag to display the values from the bean.
-
Use an ordered list to display all the elements.
-
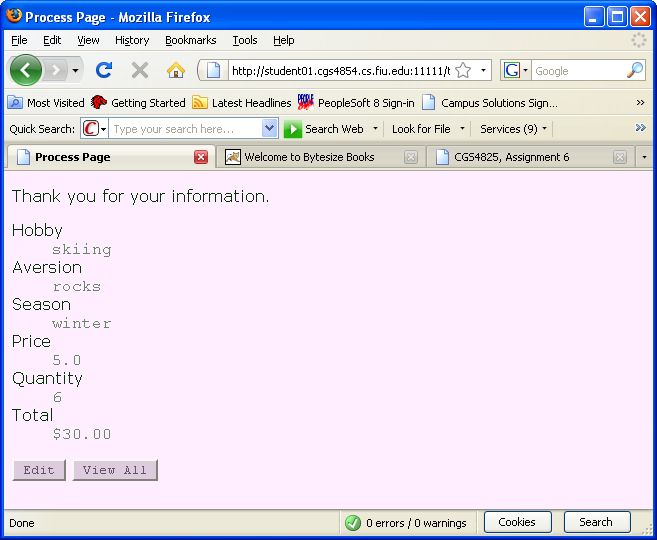
Process page
-
Use the
kbd tag to display the values from the bean.
-
Use a detail list to display all the elements.
-
Do not display all the data from the database on this page.
-
Add a button to return to the edit page and change the current bean.
-
Add a button to proceed to the view page.
-
View page
-
Use a table to display all the data from the database.
-
Use the ins tag to display the
id field.
-
The first row in the database should use a
th tag for
each column name.
-
Add a button to start a new request.
-
Here is an example of how some of the pages might look:
index.html, 404
error, Tomcat ROOT,
Edit.jsp,
Confirm.jsp,
Process.jsp,
View.jsp
-
Add a heading to the index.jsp in the ROOT of Tomcat.
-
Be sure there is a hypertext link in the
index.jsp page
to the controller. Use a relative link.
-
The web app must use the secure web.xml file and should only allow
you and me to access your application:
Edit tomcat users
-
Be sure to modify the project so that the .java files are placed in
the WAR file: Configuring WAR File
-
After the app is running in NetBeans, upload it and run it on ocelot:
Uploading a WAR file
Submitting the Assignment
Clean and Build your web application. After doing this, navigate to
the WAR file in NetBeans and verify that the .java files are included:
View WAR File
-
Since you are using a log file that is in the web application, you will need
to shut down Tomcat before you can do a Clean and Build.
-
Open the Services (Runtime in 5.5) folder and open the
Servers folder.
-
Right-click the Tomcat server and select Stop.
-
Now you can do a Clean and Build.
In the operating system (not in NetBeans) navigate to the dist folder in
the NetBeans project.
Deploy the WAR file on ocelot:
Deploy a WAR
File
-
After deploying, open the
WEB-INF/logs directory in winscp or
on ocelot.
-
Change the permission of the
error.log file to 606. This will
allow Tomcat to write to the file.
-
Use the manager to stop your web application and then start it again. This
will force it to reread the
web.xml file so that the logger
can be initialized.
-
Access your application and visit all the pages, then verify that some new
messages have been added to the log file.
To hand in the assignment, zip the following directories into one ZIP file
and upload it.
-
Please delete your old ZIP file that you used to submit homework.
rm username.zip
Replacing username with your user name.
-
Please zip the following. Issue a separate ZIP command for each. All the
files will be added to the same ZIP file.
-
Please use the following command to compress your
cgs4825/webapps/username folder.
zip -r username ~/cgs4825/webapps/username -x \*.jar \*.zip
	\*.war
Replacing username with your user name. This will create a file named
username.zip. It contains the username web application.
-
Please use the following command to compress your cgs4825/serverRoot
folder.
zip -r username ~/cgs4825/serverRoot -x \*.jar \*.zip \*.war
Replacing username with your user name. This will create a file named
username.zip. It contains the username web application.
-
Please use the following command to compress your cgs4825/docRoot
folder.
zip -r username ~/cgs4825/docRoot -x \*.jar \*.zip \*.war
Replacing username with your user name. This will create a file named
username.zip. It contains the username web application.
-
Check the size of the ZIP file, it should be less than 3 MB. If it is not,
then you probably have another ZIP file stored in the ZIP archive. Delete
it and re-zip.
-
You then have a choice for submitting the file.
-
If you are logged onto ocelot, use my uploading program to upload the file.
Enter this command at the command prompt:
~downeyt/cs/public/webftp/webftp.pl
-
If you are using winscp, then download the zip file to your computer; then,
upload the file to me:
Submitting
homework on-line via the Web.
-
Upload the file as binary.
Be sure that all your files and subdirectories are included in the zip
file.
After uploading, do not modify your files on ocelot until after your assignment
has been graded.