If you did not do a previous extra credit, then create a web application named Tutorials in NetBeans. Review the web page that contains instructions on creating a servlet in a NetBeans project: Creating a Project in NetBeans
All previous Extra Credits should still be able to be accessed and run from the application.
If you had errors in any of the previous extra credits, fix them, so that you do not lose points again for old mistakes.
There are more detailed instructions for the tutorial on the book's web site.
It is essential that you complete Extra Credit 5, if you plan to complete any of the remaining assignments. Even if you do not get Extra Credit 5 working, please submit it so that I can give you feedback on getting it to work.
Implement the Enhanced Controller in the Tutorials web application. It must work exactly like the example from Chapter 4 of the book.
Controller.java and
ControllerHelper.java in the ch4.enhanced package
in the Source Packages folder in NetBeans. RequestDataDefault.java file in
the ch3.defaultValidate package in the Source Packages
folder in NetBeans. There are no changes to the bean for this tutorial.ch4.enhanced package in the
Source Packages folder in NetBeans.
ch4.enhanced package.ControllerHelper class. Names are case-sensitive. shared in the Source
Packages folder. Place the following in the package.
InitLog4j.java HelperBaseCh4.java ButtonMethod.java log4j-1.2.16.jar commons-collections-3.2.1.jar commons-logging-1.1.1.jar commons-beanutils-1.8.3.jar /ch4/enhanced/Controller.
bytesizebook.guide.ch4. You may change this after the extra credit is running.
INFO. You may change this after you get the extra credit running.
InitLog4j servlet.
/WEB-INF/logs/error.ch4.log
InitLog4j servlet. WEB-INF folder.
WEB-INF named
logs. logs folder named
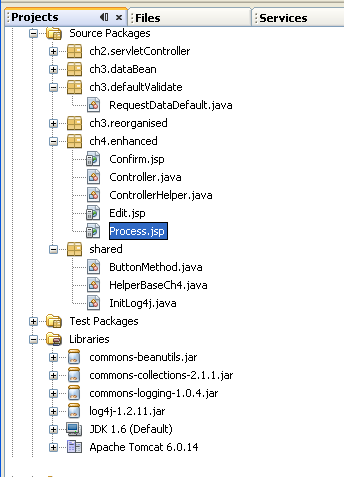
error.ch4.log. When you are done with everything, your directory and file structure should
look like this.

Take a look at your log file, you will see that there are messages in it.
build ->
web -> WEB-INF -> logs error.ch4.log file. It will look something like
this.
Be sure that your NetBeans project is configured so that .java files are added to the WAR file: Adding .java files to a WAR file
Clean and Build your web application. After doing this, navigate to the WAR file in NetBeans and verify that the .java files are included: View WAR File
In the operating system (not in NetBeans) navigate to the dist folder in the NetBeans project.
Deploy the WAR file on ocelot: Deploy a WAR File. Be sure to change the permission of the error.ch4.log on ocelot to 606.
In the index.jsp file in the ROOT web app on ocelot, add a hypertext link to the Tutorials web app. Use a relative reference.
To hand in the assignment, zip the cgs4854 directory on ocelot and upload it.
zip -r username ~/cgs4854 -x \*.jar \*.zip \*.war~downeyt/public/webftp/webftp.pl Be sure that all your files and subdirectories are included in the zip
file.
After uploading, do not modify your files on ocelot until after your assignment
has been graded.