CGS4854 Extra Credit 6
Due Tuesday, 11/12 (late 11/13 at 6am)
This tutorial will take longer than other extra credit. Start earlier.
Use the same web application that you used for previous extra credit. If you
did not do a previous Tutorial, then create a web application named
Tutorials in NetBeans. Review the web page that contains instructions on
creating a servlet in a NetBeans project: Creating a Project
in NetBeans
All previous Extra Credit should still be accessible and runnable from the
application.
If you had errors in any of the previous extra credit, fix them, so that you do
not lose points again for old mistakes.
Implement the Persistent Controller in the Tutorials
web application. (Do not implment the example that uses a separate config file for
Hibernate.) It must work exactly like the example from Chapter 5 of the
book. The example from the book also does required validation and uses POST and
GET.
Detailed instructions can be found on the book's website: Ch5 Tutorials
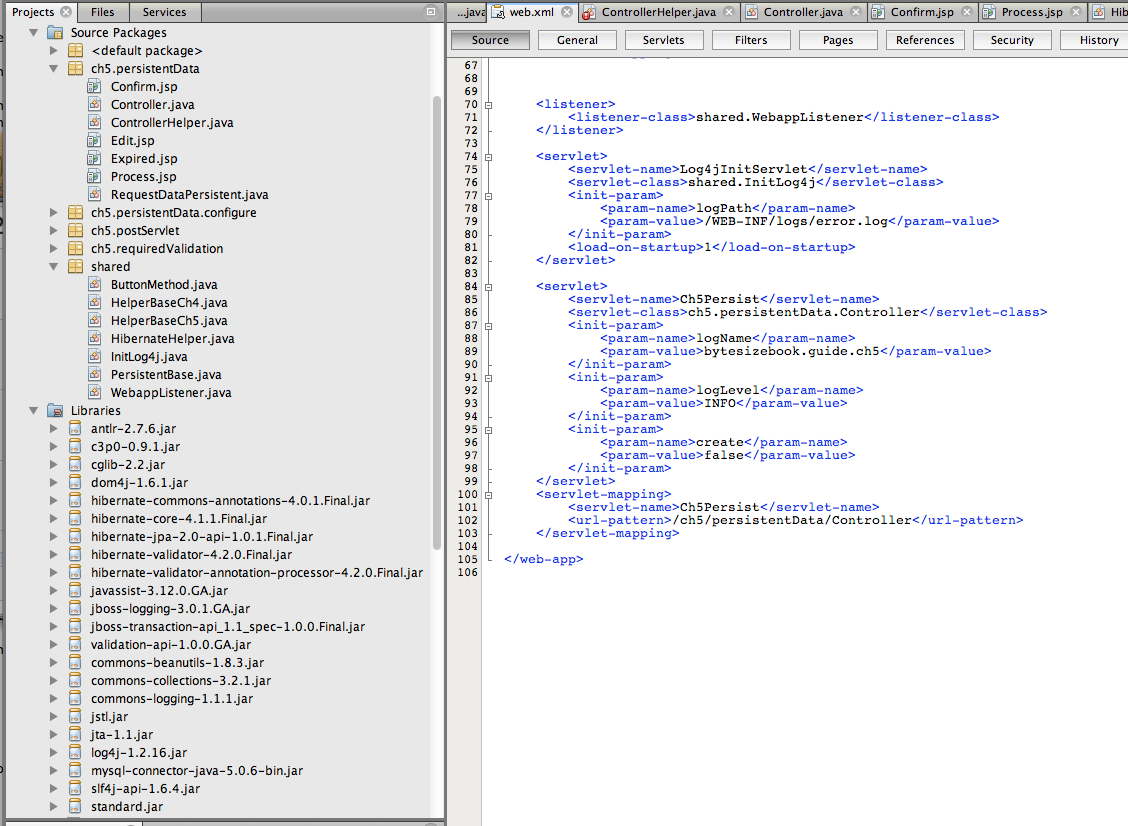
When you are done with everything, your directory and file structure should
look like this. Note:
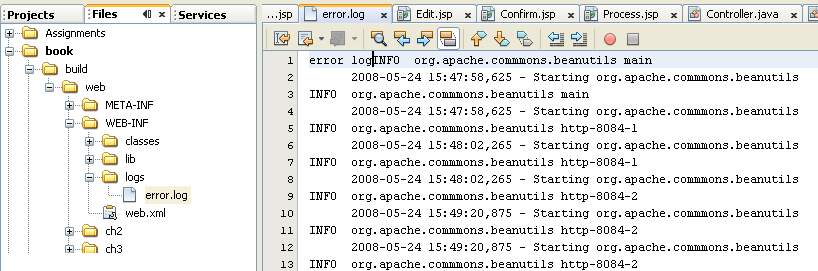
Take a look at your log file, you will see that there are messages in it.
- Open the Files tab in NetBeans and navigate to
build ->
    web -> WEB-INF -> logs
- Open the
error.log file. It will look something like
this.
Common Problems
In the event that you cannot connect when you try to access the controller,
then Tomcat will get stuck. You will not be able to stop it or start it. Follow
one of these steps to free up Tomcat
- Drastic: Reboot
- Not so drastic: open the task manager; click the processes tab; sort by
process name; look for java.exe; stop them. One of the java.exe processes
is Tomcat. Kill it and you will be able to start it again. Before you start
it again, be sure you have found the database configuration error that
caused the original problem.
Connecting to a database for the first time can be frustrating. Most of the
time, the problem is with the username and password for mysql.
- Try connecting to mysql directly from ocelot.
mysql -h ocelot.aul.fiu.edu -u spr16_username -p <Enter
    Key>
Enter your password on the next line after hitting enter. After you
connect, just type exit; to disconnect.
- Check that you are using the mysql username in the initHibernate method
in the controller helper; it looks like
spr16_username.
- Check that you are using the mysql password in the initHibernate method
in the controller helper. This password starts as your Panther ID. It is a
good idea to change it.
- Check that you have the correct connection string for ocelot:
jdbc:mysql://ocelot.aul.fiu.edu:3306/spr16_username
- Be sure to add the initialization parameter named create to the servlet
definition for the controller.
- Check that you have changed the create parameter to true in web.xml, so
that the table can be created.
- Check that you have changed the create parameter to false in web.xml
after you create the table, so that you can accumulate records in the
database.
Test the connection in NetBeans
- Open the Services tab.
- Right-click the Databases folder.
- Select Add New Connection.
- Select the MySQL driver from the Driver drop-down list.
- Click Next.
- Set the Host to ocelot.aul.fiu.edu
- Set the port to 3306
- Set the database to spr16_username
- Set the user name to spr16_username
- Set the password to your password (initial password is pid)
- Click Test Connection
- If it does not succeed, then you have a problem. Make changes and try
again.
- Click Cancel after you have connected successfully.
Submitting Homework
Before you submit your homework, be sure that you have set the
create parameter in the web.xml file to false.
Be sure that your NetBeans project is configured so that .java files are
added to the WAR file: Adding .java
files to a WAR file
Clean and Build your web application. After doing this, navigate to
the WAR file in NetBeans and verify that the .java files are included: View WAR
File
- Since you are using a log file that is in the web application, you will
need to shut down Tomcat before you can do a Clean and Build.
- Open the Services (Runtime in 5.5) folder and open the
Servers folder.
- Right-click the Tomcat server and select Stop.
- Now you can do a Clean and Build.
In the operating system (not in NetBeans) navigate to the dist folder in the
NetBeans project.
Deploy the WAR file on ocelot: Deploy a WAR File
- After deploying, open the
WEB-INF/logs directory in winscp
or on ocelot.
- Change the permission of the
error.log file to 606 and
restart the web app from your manager. This will allow Tomcat to write to
the file.
- Access your application and visit all the pages, then verify that some
new messages have been added to the log file.
The WAR file is too big for you to submit to me. To hand in
the tutorial, zip the Tutorials web app directory and upload it. If your
web app is named something other than Tutorials, then use that name in
the zip command.
- Remove the old zip file from the last upload.
rm ~/username.zip
- Please use the following command to compress your webapps
folder.
zip -r ~/username ~/cgs4854/webapps/Tutorials -x \*.jar \*.zip \*.war
    \*.jpg \*.png \*.gif
Replacing username with your user name. This will create a file
named username.zip.
- Check the size of the ZIP file, it should be less than 3 MB. If it is
not, then you probably have another ZIP file stored in the ZIP archive.
Delete it and re-zip.
- You then have a choice for submitting the file.
- If you are logged onto ocelot, use my uploading program to upload the
file. Enter this command at the command prompt:
~downeyt/cs/public/webftp/webftp.pl
- If you are using winscp, then download the zip file to your computer;
then, upload the file to me: Submitting
homework on-line via the Web.
- Upload the file as binary.