Project: SDN
- Overview:
- Environment Setup
- Detailed instructions for setting up the experiment environment:
- Exercise
- Submission Guide:
Overview:
The goal of this project is to build a simulation environment for experimenting with software-defined networks (SDN). The environment includes (i) a Mininet Virtual Machine, for simulating a network with switches and hosts; and (ii) a FloodLight controller, running on the host machine.
This document may be updated as needed to update version numbers and other important information. Please report any changes needed.
Environment Setup
The best way to guarantee full credit for the project is to do project development using a Ubuntu 16.04-based virtual machine.
You can easily create an image in your favourite virtualization engine (VirtualBox, VMware) using the Vagrant platform and steps outlined below.
Set Up Vagrant and Create VM Instance
Note that all example commands are executed on the host machine (your laptop), e.g., in Terminal.app (or iTerm2.app) on macOS, cmd in Windows, and console or xterm on Linux. After the last step (vagrant ssh) you will get inside the virtual machine and can compile your code there.
-
Download and install your favourite virtualization engine, e.g., VirtualBox
-
Download and install Vagrant tools for your platform
-
Set up project and VM instance
-
Clone project template
git clone https://github.com/aa-fiu-classes/fall17-tcn-6430-project ~/project cd ~/project -
Initialize VM
vagrant upDo not start VM instance manually from VirtualBox GUI, otherwise you may have various problems (connection error, connection timeout, missing packages, etc.)
-
To establish an SSH session to the created VM, run
vagrant ssh
If you are using Putty on Windows platform,
vagrant sshwill return information regarding the IP address and the port to connect to your virtual machine. -
-
Work on your project
All files in
~/projectfolder on the host machine will be automatically synchronized with/vagrantfolder on the virtual machine. For example, to compile your code, you can run the following commands:vagrant ssh cd /vagrant make
Notes
-
If you want to open another SSH session, just open another terminal and run
vagrant ssh(or create a new Putty session). -
If you are using Windows, read this article to help yourself set up the environment.
Detailed instructions for setting up the experiment environment:
-
Login to the virtualized environment (
vagrant ssh)-
Download and unpack OpenDaylight controller Carbon SR1 release
wget https://nexus.opendaylight.org/content/repositories/public/org/opendaylight/integration/distribution-karaf/0.6.1-Carbon/distribution-karaf-0.6.1-Carbon.tar.gz mkdir opendaylight tar -x -C opendaylight --strip-components 1 -zf distribution-karaf-0.6.1-Carbon.tar.gz -
Start the controller (the process will take a couple of minutes first time):
  cd opendaylight
  ./bin/karaf
After everything started, you should see
vagrant@vagrant:~$ cd opendaylight vagrant@vagrant:~/opendaylight$ ./bin/karaf Apache Karaf starting up. Press Enter to open the shell now... 52% [=====================================> ] ________ ________ .__ .__ .__ __ \_____ \ ______ ____ ____ \______ \ _____ ___.__.| | |__| ____ | |___/ |_ / | \\____ \_/ __ \ / \ | | \\__ \< | || | | |/ ___\| | \ __\ / | \ |_> > ___/| | \| ` \/ __ \\___ || |_| / /_/ > Y \ | \_______ / __/ \___ >___| /_______ (____ / ____||____/__\___ /|___| /__| \/|__| \/ \/ \/ \/\/ /_____/ \/ Hit '<tab>' for a list of available commands and '[cmd] --help' for help on a specific command. Hit '<ctrl-d>' or type 'system:shutdown' or 'logout' to shutdown OpenDaylight. opendaylight-user@root> -
Install OpenDaylight features in the prompt (it may take a while):
feature:install odl-dlux-core odl-dluxapps-applications odl-mdsal-apidocs odl-l2switch-switch-ui odl-openflowplugin-flow-services odl-openflowplugin-flow-services-rest odl-openflowplugin-flow-services-ui
-
-
Login to the virtualized environment (
vagrant sshin a separate window or use screen/tmux)2.1. Start Mininet and connect to the controller
sudo mn --topo single,3 --mac --switch ovsk --controller remote,ip=127.0.0.1,port=6653This will create a simple three node connected via an OpenFlow switch in Mininet. The switch will also connect to the OpenDaylight controller running on the virtual machine..
To learn more about the command line arguments, simply do
sudo mn –h -
Explore OpenDaylight web GUI and Mininet
To see a live view of the network, go to http://localhost:8181/index.html#/topology (login credentials are admin/admin)
Until you start any network activity in the Mininet, you will see just switch. After you start pinging hosts inside Mininet, the hosts will appear and you will be able to see per-port statistics.
-
Explore flow table that is populated by the SDN controller. Use
sudo ovs-ofctl dump-flows s1andsudo ovs-ofctl dump-flows s2commands at different stages.
Exercise
-
Create the following topology in Mininet: (Note:
s1ands2are switches,h1,h2,h3, andh4are hosts. The bandwidth of each link is also given and must be implemented. ). Include output ofdump,nodes,linkscommands in your report.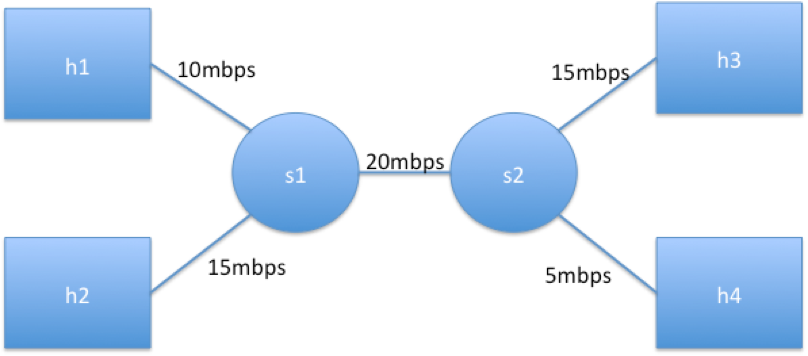
You will need to create a simple python file to do this (or generate using Mininet topology editor). You will also need to include the
bw=Xsetting when adding links in the script, where X is a number such as 20, 15, 10 or 5. Finally, when starting Mininet using thesudo mn ...command, you will need to add--link=tcto enforce the bandwidth setting in the resulting network.tcstands fortraffic control. -
Connect the above Mininet topology to SDN Controller. Test the connectivity among the hosts, using the pingall command. Include screenshot of the output.
-
Immediately After finishing the pingall test, take a screenshot of the network topology as displayed by OpenDaylight
-
Now use
iperfto confirm the bandwidth betweenh1andh4, betweenh2andh3, betweenh1andh2, and betweenh3andh4. Include the screenshots of all theiperfoutput. -
Report and interpet content of flow tables in switches
s1ands2:
- just after starting Mininet
- after running
h1 ping h4 - after running
pingall
Submission Guide:
Please submit to gradescope a report in PDF format that includes the following descriptions:
- your experience setting up Linux environment
- installing and working with Mininet, working with Mininet
- working with SDN controller
Make sure you list encountered problems and how you (tried to) resolved them.
Your description must include screenshots at different stages of your experimentation. Make sure the resolution is high enough so that the screenshots can be easily read!
Plagiarism will be reported to the university for academic dishonesty.