Lab 7: OpenVPN
- Overview
- Tasks
- Conclusion / Submission
- Conclusion / Submission
Overview
The goal of this lab is to experience an advance network setup and, specifically, setting up the OpenVPN server and configuring clients. While the process is straightforward, it involves a lot of steps that need to be followed correctly.
The instructions in this lab are adopted from Medium.com tutorial.
Tasks
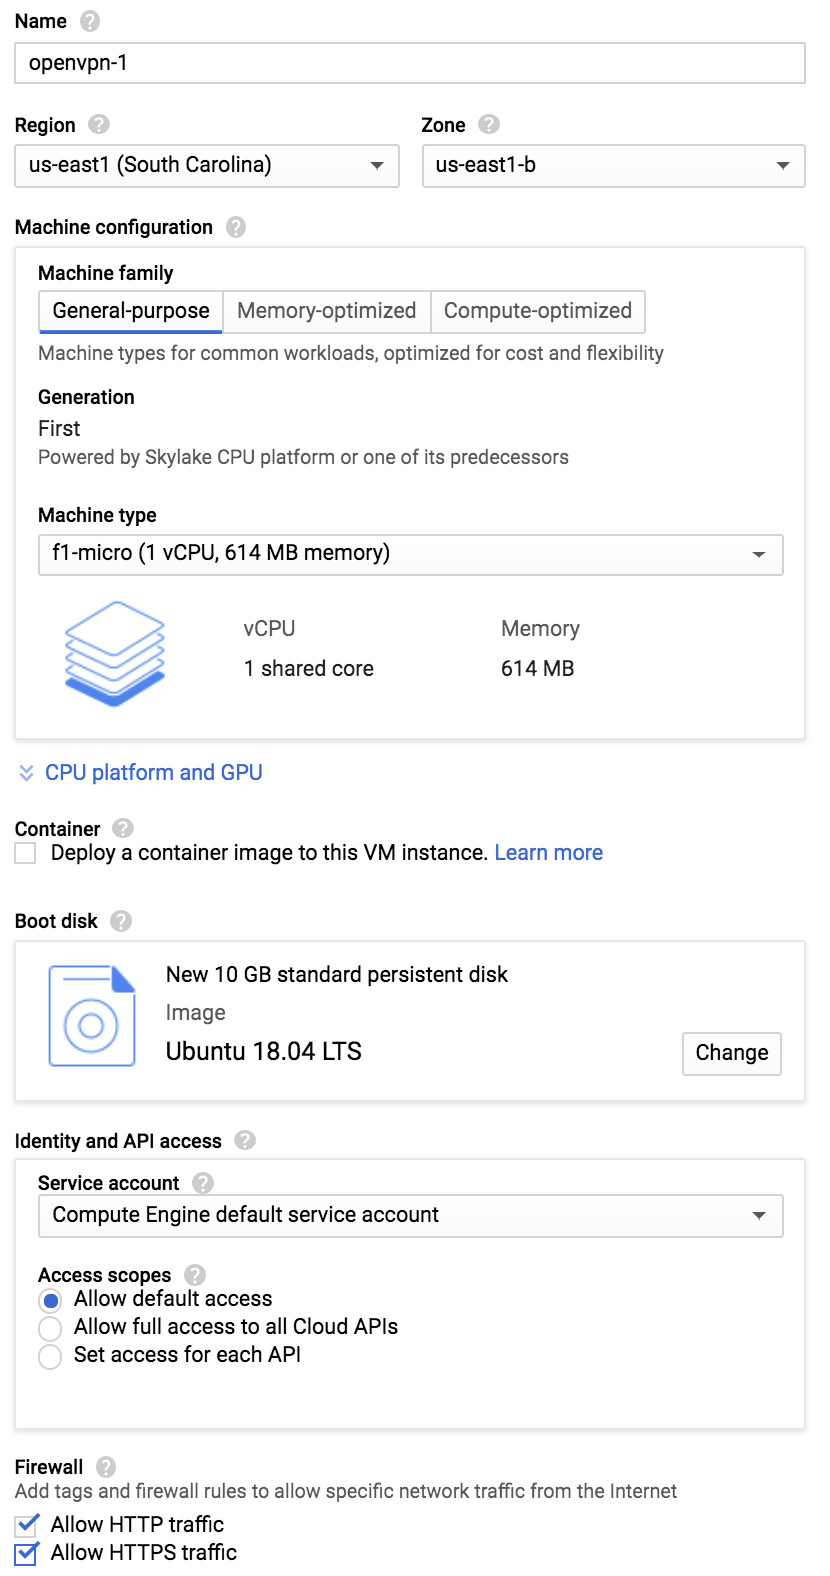
1. Create instance for OpenVPN server
Create an instance with the name openvpn-1 and the following parameters:
-
Region:
us-east1, zoneus-east1-b -
Machine configuration:
f1-micro(Generation: First) -
Boot disk:
Ubuntu 18.04 LTSNote. I recommend that you do not select the “minimal” version, as it is missing a lot of things, such as command-line editors.
-
Firewall:
Allow HTTP trafficandAllow HTTPS trafficOther firewall settings are up to you. You can enable other ports, but those not required in this lab.
2. Install dependencies
You will need to install openvpn, which is the VPN server itself, and easy-rsa, the package that will allow you to set up an internal certificate authority (CA).
sudo apt update
sudo apt install openvpn easy-rsa
or if you want to avoid typing sudo all the time
sudo -s
apt update
apt install openvpn easy-rsa
Optionally, you can also upgrade all the packages to their latest versions using sudo apt upgrade (generally, a good idea to keep everything up-to-date), but it is not required in this lab.
3. Set up CA
3.1. Create CA environment using EasyRSA
Because OpenVPN uses TLS/SSL, it needs certificates to encrypt traffic.
For this, you will need to issue your own trusted certificates, which we can do using the custom CA.
First step is to run make-cadir command from the EasyRSA package (note that you do not have to do it as superuser):
make-cadir ~/openvpn-ca
cd ~/openvpn-ca
cp openssl-1.0.0.cnf openssl.cnf
The last step is necessary to ensure that everything works in Ubuntu 18.04. Otherwise, you will most likely going to get errors at the later stages.
In lab-2 you have already explored contents of the certificates: common name, serial number.
The certificate can also contain various additional parameters about the certificate: country, address, company division, etc.
The same applies for the certificate (the self-signed one) that is created during the CA setup.
For this, you would need to edit vars file that was automatically created in ~/openvpn-ca folder.
You can keep most of the default values, except that you need to change KEY_COUNTRY, KEY_PROVINCE, KEY_CITY, KEY_ORG, KEY_EMAIL, KEY_OU, and KEY_NAME fields.
It does not really matter which values you pick for the first 6, but make sure you use tcn6430 for KEY_NAME as the following instructions assume this value.
For example, set it to the following values:
# These are the default values for fields
# which will be placed in the certificate.
# Don't leave any of these fields blank.
export KEY_COUNTRY="US"
export KEY_PROVINCE="FL"
export KEY_CITY="Miami"
export KEY_ORG="TCN-6430 Class"
export KEY_EMAIL="mysuperemail@mysuperdomain.com"
export KEY_OU="Fall 2019"

# X509 Subject Field
export KEY_NAME="tcn6430"
After you done editing, you are ready to “build” the CA:
source ./vars
./build-ca
Example interactions:
cawka@openvpn-1:~/openvpn-ca$ source vars
NOTE: If you run ./clean-all, I will be doing a rm -rf on /home/cawka/openvpn-ca/keys
cawka@openvpn-1:~/openvpn-ca$ ./build-ca
Can't load /home/cawka/.rnd into RNG
140514787750336:error:2406F079:random number generator:RAND_load_file:Cannot open file:../crypto/rand/randfile.c:88:Filename=/home/cawka/.rnd
Generating a RSA private key
.....+++++
...........................................+++++
writing new private key to 'ca.key'
-----
You are about to be asked to enter information that will be incorporated
into your certificate request.
What you are about to enter is what is called a Distinguished Name or a DN.
There are quite a few fields but you can leave some blank
For some fields there will be a default value,
If you enter '.', the field will be left blank.
-----
Country Name (2 letter code) [US]:
State or Province Name (full name) [FL]:
Locality Name (eg, city) [Miami]:
Organization Name (eg, company) [TCN6430]:
Organizational Unit Name (eg, section) []:
Common Name (eg, your name or your server's hostname) [TCN6430 CA]:
Name [tcn6430]:
Email Address [mysuperemail@mysuperdomain.com]:
The CA keys should be created in ~/openvpn-ca/keys folder (ca.key, ca.crt, and a few others)
3.2. Generate server certificate
You will need to create a server certificate and an encryption key to ensure our traffic is secure. To do so:
./build-key-server tcn6430
Example interactions:
cawka@openvpn-1:~/openvpn-ca$ ./build-key-server tcn6430
Can't load /home/cawka/.rnd into RNG
139666844266944:error:2406F079:random number generator:RAND_load_file:Cannot open file:../crypto/rand/randfile.c:88:Filename=/home/cawka/.rnd
Generating a RSA private key
........................+++++
..+++++
writing new private key to 'tcn6430.key'
-----
You are about to be asked to enter information that will be incorporated
into your certificate request.
What you are about to enter is what is called a Distinguished Name or a DN.
There are quite a few fields but you can leave some blank
For some fields there will be a default value,
If you enter '.', the field will be left blank.
-----
Country Name (2 letter code) [US]:
State or Province Name (full name) [FL]:
Locality Name (eg, city) [Miami]:
Organization Name (eg, company) [TCN6430]:
Organizational Unit Name (eg, section) []:
Common Name (eg, your name or your server's hostname) [tcn6430]:
Name [tcn6430]:
Email Address [me@myhost.mydomain]:

Please enter the following 'extra' attributes
to be sent with your certificate request
A challenge password []:
An optional company name []:
Using configuration from /home/cawka/openvpn-ca/openssl.cnf
Can't load /home/cawka/.rnd into RNG
140082025517504:error:2406F079:random number generator:RAND_load_file:Cannot open file:../crypto/rand/randfile.c:88:Filename=/home/cawka/.rnd
Can't open /home/cawka/openvpn-ca/keys/index.txt.attr for reading, No such file or directory
140082025517504:error:02001002:system library:fopen:No such file or directory:../crypto/bio/bss_file.c:72:fopen('/home/cawka/openvpn-ca/keys/index.txt.attr','r')
140082025517504:error:2006D080:BIO routines:BIO_new_file:no such file:../crypto/bio/bss_file.c:79:
Check that the request matches the signature
Signature ok
The Subject's Distinguished Name is as follows
countryName           :PRINTABLE:'US'
stateOrProvinceName   :PRINTABLE:'FL'
localityName          :PRINTABLE:'Miami'
organizationName      :PRINTABLE:'TCN6430'
commonName            :PRINTABLE:'tcn6430'
name                  :PRINTABLE:'tcn6430'
emailAddress          :IA5STRING:'me@myhost.mydomain'
Certificate is to be certified until Oct 18 18:25:55 2029 GMT (3650 days)
Sign the certificate? [y/n]:y


1 out of 1 certificate requests certified, commit? [y/n]y
Write out database with 1 new entries
Data Base Updated
4. Configure OpenVPN
4.1. Generated server encryption key
To generate an encryption key to ensure our traffic is secure, run:
./build-dh
Example interactions:
cawka@openvpn-1:~/openvpn-ca$ ./build-dh
Generating DH parameters, 2048 bit long safe prime, generator 2
This is going to take a long time
..................................................................+...........................+.................................................................................................+....+....................................+........................................................................................................................................................................................................................................+..+............................................................................+........................................................+...................+....................................................+................................................+....................................................+..........................................................................................+................................................................................................................+..........................+..........+..............................+...+........................................................................................................+........................+..............................................................................................+......+............+..................................................................................+...........+.........................................................................................+.............................................................................................................................................+.........................................................................................................................................................+.............................................................................................................+...........................................................+...................................+................................................+....................+...................................................................................................................................................+.......................................................................................................................................................+...........................................................................................+..........................+.....................................................+.............................................................+................................................................................................+.............................................+................................................................+.......................................+.............................................................................................+.............................................................................................................................................+.................................................................................................................................................+............+........................................................................................................................................................................................................................................................................................................................................................................................................................................................................................................................................................................................................+........................+..........................................+........................+.....................................+...............+.............+...........................................................................+..................................+...............................................................................................................+...............+.................................................+................................................................................................+..............................................................................................................................................................................................................+........+........................................................................................................................................................+..................................................................................................................................................................................................................................................................+..............................................................................................................................................+...........................................................................................................................................+..............................................................................................................+....................................................................................................................................................+..................................................................................................+.................................................+..................................................................................................................................................................................................................................................................................................................................................................................++*++*++*++*
This should generate a Diffie-Hellman key, which tends to be rather strong. It may take a few minutes for the key to be generated.
To finalize, run actual generation of a signed secret:
openvpn --genkey --secret keys/tiv.key
4.2. Take a deep breath
At this point, we are almost done with the server part of the configuration. Dealing with keys is not quite easy and, so far, we just configured the CA, created a key signed by the CA for the server to use, and generated the key that we will use to encrypt the traffic between the server and clients. We have not yet touched the VPN configuration, system updates, or client configuration.
So. Deep breath, and move to the next step.
4.3. Configure Ubuntu to act as router and perform NAT
First, you need to enable IP forwarding in Linux kernel:
sudo vim /etc/sysctl.conf
Look for the following line and remove the # (comment character).
net.ipv4.ip_forward=1
Save and close. To update the session settings, run:
sudo sysctl -p
Next, we need to find and update our firewall (UFW) rules to masquerade clients (these are Linux terms for setting up the NAT rules). The first step is to find the interface that we’re running on:
ip route | grep default
The interface we want is the one that has the word “dev” in it. In our case, that looks like this:
default via 10.142.0.1 dev ens4 proto dhcp src 10.142.0.2 metric 100
So, our interface is ens4. With this, we’ll update our firewall rules:
sudo vim /etc/ufw/before.rules
Above just above where it says Don't delete these required lines... add the following code:
# OPENVPN
# NAT Table
*nat
:POSTROUTING ACCEPT [0:0]
# OpenVPN client traffic
-A POSTROUTING -s 10.8.0.0/8 -o ens4 -j MASQUERADE
COMMIT
# OPENVPN
Save and close. Next, we need to forward packets.
sudo vim /etc/default/ufw
Find the DEFAULT_FORWARD_POLICY directive and change it from “DROP” to “ACCEPT”.
DEFAULT_FORWARD_POLICY="ACCEPT"
Save and close.
Now, you need to activate firewall (including NAT rules) settings, and don’t forget to enable TCP port 80 and TCP port 443 in the local firewall (google cloud settings is for network configuration):
sudo ufw allow 80/tcp
sudo ufw allow 443/tcp
sudo ufw enable
Note that if you made a mistake in editing before.rules file, you may SSH access to the VM (and may need to restart the process). So, please be careful here.
4.4. Make OpenVPN config
Copy CA certificate and generated server key and certificate to OpenVPN config folder:
cd ~/openvpn-ca/keys
sudo cp ca.crt tcn6430.crt tcn6430.key tiv.key dh2048.pem /etc/openvpn
Create the following OpenVPN server config file /etc/openvpn/tcn6430.conf
sudo vim /etc/openvpn/tcn6430.conf
with the content:
local 0.0.0.0
port 443
proto tcp

;dev tap
dev tun

ca ca.crt
cert tcn6430.crt
key tcn6430.key  # This file should be kept secret

dh dh2048.pem

server 10.8.0.0 255.255.255.0

ifconfig-pool-persist /var/log/openvpn/ipp.txt

push "redirect-gateway def1 bypass-dhcp"

push "dhcp-option DNS 8.8.8.8"
push "dhcp-option DNS 1.1.1.1"

keepalive 10 120

tls-auth tiv.key 0
key-direction 0

cipher AES-128-CBC
auth SHA256

user nobody
group nogroup

persist-key
persist-tun

status /var/log/openvpn/openvpn-status.log
verb 3
The highlights of this instance of VPN server:
-
it will run VPN server on all available IP addresses (
local 0.0.0.0) on TCP port 443 (port 443,proto tcp). If you change these values, you will need to properly open ports in Google Cloud firewall -
it uses secret key (
key tcn6430.key) and CA-issued certificate (cert tcn6430.crt) to authenticate itself to clients. Only clients who “trust” your custom CA will continue communication with the VPN server. -
for each new session will give out IP addresses from range
10.8.0.1-10.8.0.254(it acts as a DHCP server) -
it will advise clients to redirect all traffic, including DNS, to the VPN channel (
push "redirect-gateway def1 bypass-dhcp"). If you want to just connect to private network, you wouldn’t generally have this line. -
it will advice clients to use 8.8.8.8 and 1.1.1.1 as caching resolvers.
You can explore other options in sample config files located in /usr/share/doc/openvpn/examples/sample-config-files folder.
5. Run OpenVPN
To start the server, run the following:
sudo systemctl start openvpn@tcn6430
To check that it started properly, run:
sudo systemctl status openvpn@tcn6430
If everything went well, you should see some output that includes Active: active (running). For example, it could look like
● openvpn@tcn6430.service - OpenVPN connection to tcn6430
   Loaded: loaded (/lib/systemd/system/openvpn@.service; disabled; vendor preset: enabled)
   Active: active (running) since Mon 2019-10-21 20:32:23 UTC; 2s ago
     Docs: man:openvpn(8)
           https://community.openvpn.net/openvpn/wiki/Openvpn24ManPage
           https://community.openvpn.net/openvpn/wiki/HOWTO
 Main PID: 17012 (openvpn)
   Status: "Initialization Sequence Completed"
    Tasks: 1 (limit: 669)
   CGroup: /system.slice/system-openvpn.slice/openvpn@tcn6430.service
           └─17012 /usr/sbin/openvpn --daemon ovpn-tcn6430 --status /run/openvpn/tcn6430.status 10 --cd /etc/openvpn --script-security 2 --config /etc

Oct 21 20:32:23 openvpn-1 ovpn-tcn6430[17012]: Listening for incoming TCP connection on [AF_INET][undef]:443
Oct 21 20:32:23 openvpn-1 ovpn-tcn6430[17012]: TCPv4_SERVER link local (bound): [AF_INET][undef]:443
Oct 21 20:32:23 openvpn-1 ovpn-tcn6430[17012]: TCPv4_SERVER link remote: [AF_UNSPEC]
Oct 21 20:32:23 openvpn-1 ovpn-tcn6430[17012]: GID set to nogroup
Oct 21 20:32:23 openvpn-1 ovpn-tcn6430[17012]: UID set to nobody
Oct 21 20:32:23 openvpn-1 ovpn-tcn6430[17012]: MULTI: multi_init called, r=256 v=256
Oct 21 20:32:23 openvpn-1 ovpn-tcn6430[17012]: IFCONFIG POOL: base=10.8.0.4 size=62, ipv6=0
Oct 21 20:32:23 openvpn-1 ovpn-tcn6430[17012]: IFCONFIG POOL LIST
Oct 21 20:32:23 openvpn-1 ovpn-tcn6430[17012]: MULTI: TCP INIT maxclients=1024 maxevents=1028
Oct 21 20:32:23 openvpn-1 ovpn-tcn6430[17012]: Initialization Sequence Completed
lines 1-22/22 (END)
You might need to hit q to exit the information panel. If you’re good, link the service to the startup sequence.
sudo systemctl enable openvpn@tcn6430
6. Take the second deep breath
If you thought you’re done, unfortunately not yet. We have done with the server part, but we still need to create client configuration (and client certificates) in order to actually connect to the VPN server. So. Deep breath, and continue.
7. Set up a client configuration structure
For ease of setting up client configs, you will first create a structure. To start, create a config folder to store the client config files (you don’t need to do this as superuser):
mkdir -p ~/clients/files
The client keys will be within these configs, so let’s lock the permissions on the files directory.
chmod 700 ~/clients/files
Create the base configuration ~/clients/base.conf
vim ~/clients/base.conf
with the content:
client
dev tun
proto tcp

# replace to your IP address (or DNS name)
remote 35.0.0.0 443

resolv-retry infinite
nobind
persist-key
persist-tun

remote-cert-tls server

key-direction 1

cipher AES-128-CBC
auth SHA256

verb 3
STOP here.
DO NOT blindly copy the contents of the above into base.conf file. You HAVE TO CHANGE IP ADDRESS in the base.conf to the public IP address of your VPN server instance.
Otherwise, the clients would be trying to connect to non-existing server.
Edited? OK, now you can continue.
Next, you will need to write a script to generate the client configs quickly and easily.
touch ~/clients/gen_config.sh
chmod 700 ~/clients/gen_config.sh
vim ~/clients/gen_config.sh
Inside, paste this code:
#!/bin/bash

KEY_DIR=~/openvpn-ca/keys
OUTPUT_DIR=~/clients/files
BASE_CONFIG=~/clients/base.conf

(cd ~/openvpn-ca; source ./vars; ./build-key "${1}")

cat ${BASE_CONFIG} \
    <(echo -e '<ca>') \
    ${KEY_DIR}/ca.crt \
    <(echo -e '</ca>\n<cert>') \
    ${KEY_DIR}/${1}.crt \
    <(echo -e '</cert>\n<key>') \
    ${KEY_DIR}/${1}.key \
    <(echo -e '</key>\n<tls-auth>') \
    ${KEY_DIR}/tiv.key \
    <(echo -e '</tls-auth>') \
    > ${OUTPUT_DIR}/${1}.ovpn
The {1} here refers to the first argument, which will be our client name.
8. Generate client config
Finally, ready to create actual client config and use (almost) OpenVPN.
cd ~/clients
./gen_config.sh mysuperduperclient
This will do automatically a few things:
-
generate public/private key pair for the client named
mysuperduperclient(you can use any name you like, just better to avoid spaces) -
create client config that embeds the keys and certificate in it. Note if you didn’t specify password to protect private key, then anybody who possess the generated
files/mysuperduperclient.ovpnfile, will be able to connect to your VPN server.
9. Share the config and test VPN
To connect to VPN server, you will need OpenVPN client. It has different names on different platforms, but exist for all known and unknown platforms, as OpenVPN is open source protocol:
- OpenVPN Connect for Windows
- Tunnelblick for macOS
- OpenVPN for linux, but it may require a few more adjustments of the config file
- OpenVPN Connect app of iOS and Android
The “hardest” part at this point is delivering the .ovpn file.
In general, it would be a really really bad idea, but for the lab we can install Apache server and share the config same way we shared cat pictures in the lab-1:
sudo apt install apache2
sudo cp ~/clients/files/mysuperduperclient.ovpn /var/www/html/
To make it a bit easier, you also need to hack mime.conf Apache file.
sudo vim /etc/apache2/mods-enabled/mime.conf
and add the following line somewhere in the middle (e.g., just after AddType application/x-bzip2 .bz2 line)
AddType application/x-openvpn-profile .ovpn
Then you’ll need to restart Apache:
sudo systemctl restart apache2
And then access it on the target device using http://30.0.0.0/mysuperduperclient.ovpn (change to your IP address!).
With Apache hack, you will be able to either save .ovpn file and then open in OpenVPN Connect (on Desktop system) or open in OpenVPN Connect mobile app.
10. Final tests
Connect VPN and check your public IP address, e.g., by going to https://whatismyipaddress.com/
Conclusion / Submission
In Gradescope, submit
-
URL to your
.ovpnfile -
Highlights of the fun you had with the server part: good fun (successes), evil fun (problems and roadblock), and any other types of fun.
-
Highlights of the fun you had with the client part: good fun (successes), evil fun (problems and roadblock), and any other types of fun.
14. Final tests
Connect VPN and check your public IP address, e.g., by going to https://whatismyipaddress.com/
Conclusion / Submission
Submit to Canvas answering the questions.
-
Dedicated key file
-
Highlights of the fun you had with the manager part: good fun (successes), evil fun (problems and roadblock), and any other types of fun.
-
Highlights of the fun you had with the server part: good fun (successes), evil fun (problems and roadblock), and any other types of fun.
-
Highlights of the fun you had with the client part: good fun (successes), evil fun (problems and roadblock), and any other types of fun.